


Welcome to the Stampin Friends Halloween/Spooky Blog Hop!
This month’s theme is Halloween or Spooky cards.
If you’re following along the hop, you’ve arrived from NAME blog.
Don’t forget to continue on the hop with NAME blog.
Be sure to continue all the way through.
You’ll have some lovely ideas for cards and projects for all things Halloween and fun!
So let’s jump right in.
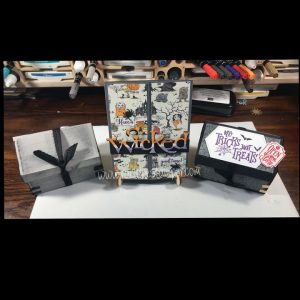
Project RECIPE
I used an 8″ by 10 1/2″ piece of Basic Gray card stock which is great because you will not have much waste.
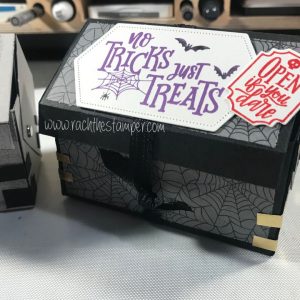
This is an idea from the Holiday Catalog, but this is a very well loved and much used (at least by me) box template.
Score on the 8″ side at 2″ and 6″
Score on the 10 1/2″ side at 2″, 4″, 6″, 8″ and 10″
You will trim your template down to look like this:

You can add strips of DSP to decorate it, they should measure 1 7/8″ by 3 7/8″
I also used a scrap piece of Gold Foil, scored it down the middle and trimmed into thin strips for the ” metal” to hold the chest together.
You can use Tear and Tape to secure your box or a Cropadile and brads like I did in the video. Stampin’ Up! use to carry the Cropadile however I got mine from Amazon and there is an affiliate link above in blue. I secured the holes with Brads in Gold but you could make yours any color.
CARD RECIPE
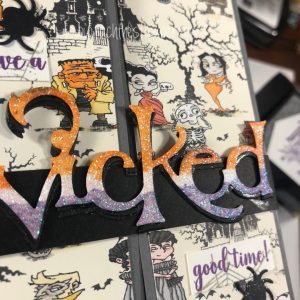
I created the card as a fun fold . I used a piece of Basic Gray cut at 5 1/2″ by 8 1/2″.
Score on the 8 1/2″ side at 2 1/8″ and 6 3/8″
I added a few strips of Monster Bash DSP to make it spooky. They measure 2″ by 5 1/4″
I closed it with a belly band of Basic Black. I used a 3/4″ strip and wrapped it around the cards so it wouldn’t be too tight and secured the back with Snail Adhesive or the like
I cut the Wicked die from Basic Black two times and once in Sparkle Glimmer paper. I added some Highland Heather and Mango Melody ink refills with an aqua painter to jazz it up. Then adhered the two black layers together and finally the glimmer paper layer just slightly off center for a spooky look.
There are also some really spooky Enamel Shapes if you want to add them to the card or “Toy Box”.
Until next time,
Stay Crafty!
XO Rach
Product List


 Scalloped Edge Ribbon")

")


Social Media Links
Follow me on Facebook!
Follow me onInstagram
Check out some great Pins
Shopwith me
Blogwith me
Chat with me at Rachthestamper@gmail.com
Ellen
You made such wonderful Halloween projects!! Great! Your boxes are so cool and I love the color effect of “Wicked” on your card. Wonderful! Thank you so much for sharing!
Wow these are truly awesome Halloween projects! I can’t wait to make the boxes!!! I love love how you did the Wicked!!! Thanks so much for sharing
Thank you so much for instructions on how to make the box, I must try this! I love the way your boxes turned out! I also LOVE the three-toned coloring of the wicked die cut. You have given me inspiration!